

Team Roles
- Zak – Production Director (Sound, Lighting, Broadcasting – Branford)
- Dan – Creative Tech Lead (Technology Owner – Special Events, Future Tech)
Vision
- To help create environments that encourage the congregation to engage with the Lord.
- Meet people where they are by supporting familiar atmospheres.
Standards
- Mixing standards are created but may vary slightly depending on campus location.
Cable Management
- Over/Under Wrapping – Use correct wrapping technique to prevent cable damage.
- Misshapen cables can be left in the sun to soften, making them easier to wrap properly.
Portal
Voxprod.rocks – Information and communication portal:
- Slack Channel – Read-only for production leads.
- Sermon Updates and Planning Information
- Songs/Slides – Available through Dropbox.
- Location Section – Campus-specific production protocols, including:
- Step-by-step system instructions
- Cheat sheets
- Photos
- Troubleshooting guides
Training 101
Mixing Basics
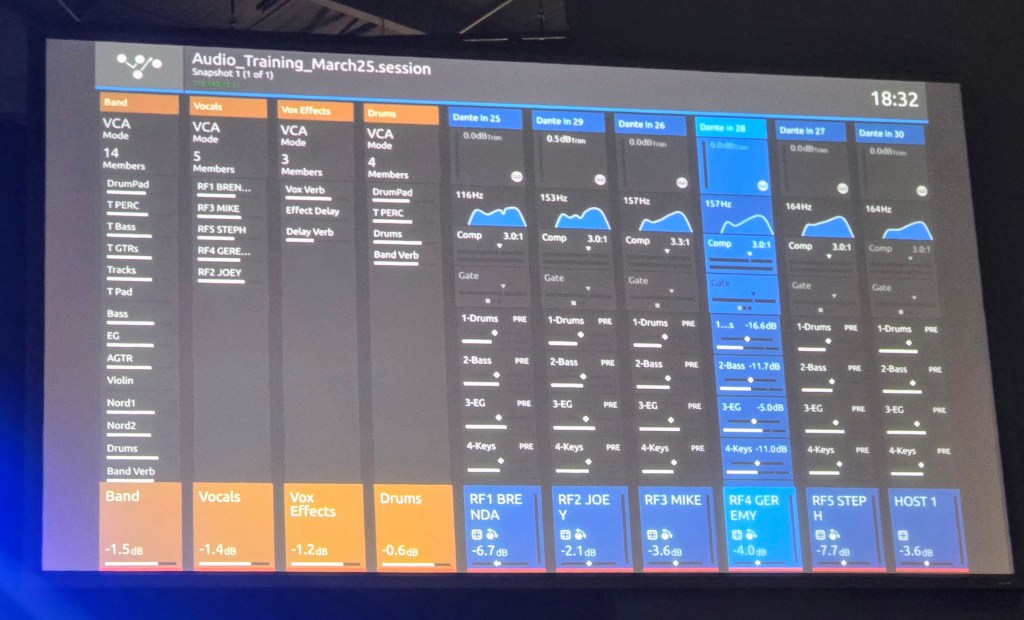
- Four VCAs – Yellow (Voice Channels are Blue)
- Yellow VCA Groups – Control volume for grouped channels. (Drums, Vocal)
Worship Overview
Welcome/Open
Walk-In and Pre-Roll
- iPod plays walk-in music when people enter.
- Pre-roll video starts (first 40 seconds are quiet).
- Keep iPod running for the first 30 seconds, then fade out into pre-roll.
- At the end of pre-roll, the band crashes out.
Vocals and Effects
- Keep vocals muted until the last 45 seconds of pre-roll.
- Unmute vocals and reduce vocal effects for the leader’s first spoken introduction.
- Adjust effects during worship to reduce reverb for speaking and increase for singing.
Host Mic
- Open as soon as the host is on stage.
- Some campuses prefer the host to control muting directly.
- When the host is speaking, reduce the keys volume for support.
- If the host transitions to prayer or offering, gradually fade them back up.
Live Stream Start
- Mute all channels at the start of the live stream.
- Unmute the keys channel only. (Solid red = mute; flashing red = unmuted.)
- When the band cues everyone to stand, unmute the band and increase vocal effects.
- When the host returns, mute the band except for low-volume keys.
Departure
- Fade in a quieter, mellow iPod track for the exit.
Soundboard Overview
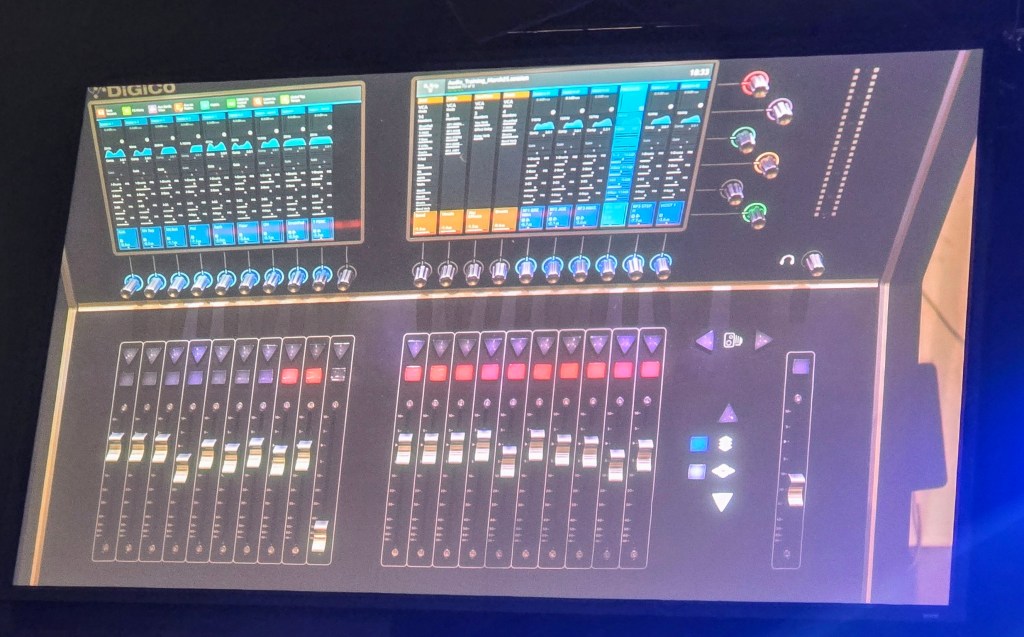
- Right-Hand Controls “Handle”– Main focus for vocals and host mics (4 faders).
- Right Side – Hit Layers – Shifts page layer to display grouped channels in BLUE (input).
- Arrows – Navigate up and down on layers.
| Color | Function |
| Blue | Source (sent to destination) |
| Purple | Aux Sends (In-ear monitors) |
| Red | Master Bus (combines channels to speakers) |
| Gold | VCA – Controls volume for grouped faders |
| Green | Matrix – Mixer after the mixer (usually not needed on Sundays) |
Channel Processing
- High Pass Filter – Removes low-frequency “mud.”
- EQ – Tonal shaping of sound.
- Compressor – Evens out dynamic range (reduces loud peaks, increases soft sounds).
- Gate – Used on drums to reduce noise when the channel is not in use.
- Outputs – Sent to AUX sends and group assigns. (Preset unless troubleshooting.)
Training 102
Signal Flow

- Blue Input Channels – Left side (signal flow from top to bottom).
- Aux Sends – Mix to in-ears for the band.
In-Ear Change
- Pac 1 – Drums channel.
- Tap the channel to turn it Purple (mixing for in-ears).
- Switch back to Blue to mix for the house.
Volume Standards
- Musicians may request dB changes, but follow production leads’ guidelines:
- 2–3 dB = A little more
- 6–10 dB = A lot more
- Higher fader = smaller dB changes; lower fader = larger dB changes.
Macros
- Top left of screen – View all aux tiles for in-ear mixing.
- Always return to Blue after mixing in-ears.
EQ and Compression Overview
EQ Adjustments
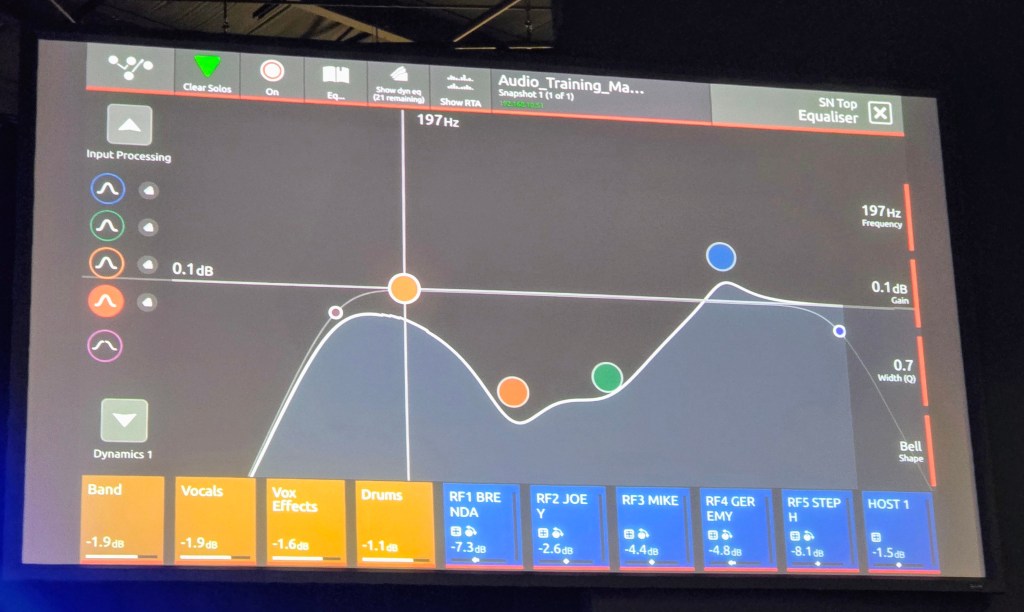
- Adjust during rehearsal, not during service.
- Subtractive EQ is preferred (boost only when necessary).
- Red = Low (Thud) | Blue = High
- “Search and destroy” method – Sweep frequencies to find trouble spots, then cut.
Compression
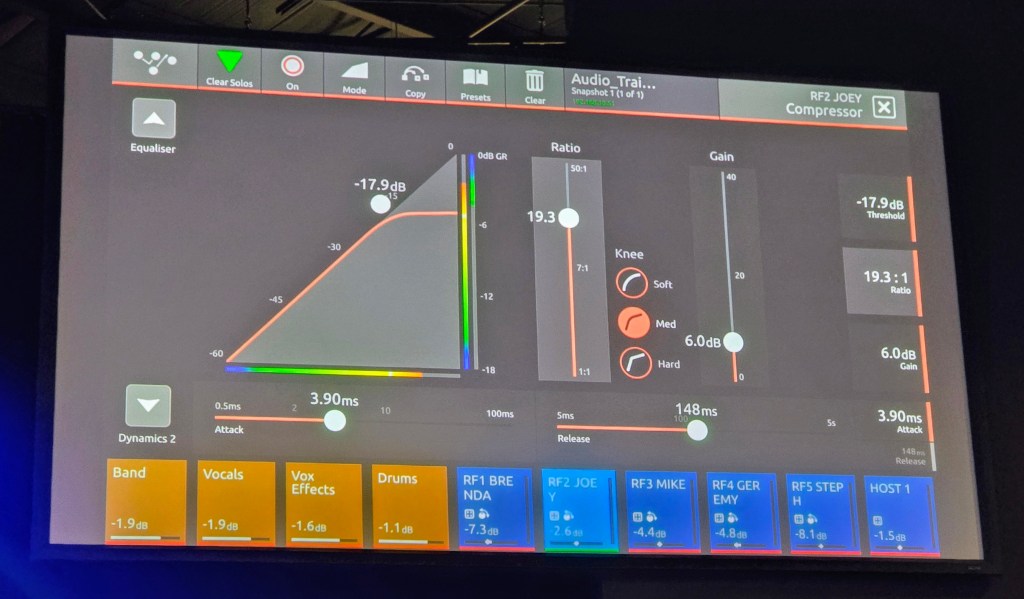
- Balances volume range between loud and quiet.
- Gain Reduction – Manage output to prevent clipping.
- Keep in the red zone without going too far into yellow for natural sound.
- Adjust Make-Up Gain to balance the dynamic range.
Mixing Tips
- Lead vocals should always sit on top of the mix.
- If you see someone playing, you should hear them.
- For smaller campuses missing musicians:
- Route the missing instrument track into the channel the instrument would have originally been routed.
- In-ear packs should be around 6 – adjust mix from there.
- Focus on what needs to be reduced rather than increasing other levels.
- If a musician’s pack is at 1 and still too loud:
- Lower inputs so the musician can increase their pack volume and regain control.
- You can only mix as quietly as the loudest instrument (usually drums).
- Feeling the energy – Keep the kick drum present in the mix.

Leave a comment